
Loading up your WordPress site only to be greeted by a blank, white page is frustrating. This is commonly referred to as the WordPress White Screen of Death error.
In this guide, we’ll walk you through how to get to the bottom of what’s causing the error on your site specifically & exactly how to fix it.
Why Do I See The White Screen of Death in WordPress?
Coming across the WordPress White Screen of Death error is particularly frustrating because – as the name implies – all you see is a white screen. No information as to what the cause could be and where to look.
Before we get into how to identify the cause of the error on your site and get everything back up & running – here’s a breakdown of the most common causes:
- PHP code errors (often, a plugin update that just took place)
- Exhausting the PHP memory limit
Note: You are more likely to run into these issues with certain WordPress hosting providers based on how they limit resources and throttle sites if a script or process from a plugin ever suddenly requires more resources. If that seems to happen all too easily with your hosting provider, it may be time to consider moving to a better WordPress hosting provider, as hosts that easily crash are also very likely to take your site offline if you were ever to run a large marketing campaign that drives a significant amount of traffic at once, etc.
So, without further ado – let’s take a look at how to fix the WSoD error on your website:
How To Fix the WordPress White Screen of Death
Step #1 – Start By Clearing Your Site’s Cache (incl. Caching Plugins)
If this is a production site, the chances are you have caching in place – and if not, you probably should. While this is highly recommended, it can mean that you’re not able to see what’s really happening on your site as you’re looking at a version that’s been cached in your browser or on the server.
Note: This also includes any additional layers of caching you may have. For example, caching plugins – be sure to clear those in addition to server-level caching in place.
After clearing your cache in WordPress, you’ll also want to clear your browser’s cache.
If you can no longer access your WordPress admin area: it is possible to clear the cache using WP-CLI. After connecting to your site via SSH – first, navigate to the directory of your site – for sites on Servebolt (the example is included in line 1 below). After that, flush the cache and optionally exclude the activation of themes and plugins when doing so:
cd ~/public
wp cache flush --skip-plugins --skip-themes
Once done, attempt to access your site again to see if the issue persists.
If it still isn’t working, read on for other potential solutions…
Step #2 – Check Your PHP Error Logs
Note: If you’re not comfortable reading log files, please skip ahead to step #3.
The very first step, once you’ve ruled out caching, is checking your PHP error logs. We always recommend defaulting to checking logs because they are the best way to find out the true source of an error, issue, or potential issue.
Learn more about viewing and examining log files here.
That way, before implementing any of the potential fixes in the article, you’ll understand why (i.e., before just testing whether raising your memory limit will fix the issue, it makes sense to know what plugin is running that requires a higher limit).
The purpose of checking error logs is to point you in the right direction. However, also actually using what you discover here is, of course, equally as important! Meaning that both errors and warnings are the first places to focus your attention, working to resolve them (if you are not comfortable with this, we recommend you work with a developer).
Step #3 – Identify Errors Using Debug Mode
The built-in “debug” mode in WordPress can help you identify any errors on the server. To enable debugging mode in WordPress, open up your wp-config.php file, and just before the last line, add the following code:
// Enable WP_DEBUG mode
define( ‘WP_DEBUG’, true );
// Enable Debug logging to the /wp-content/debug.log file
define( ‘WP_DEBUG_LOG’, true );
Note: Enabling WP_DEBUG mode will cause all PHP errors, notices, and warnings to be displayed. This can show errors and warning messages for things that aren’t broken as well but do not follow WordPress (and/or PHP) development conventions.
Now, when you open the website, you might see errors or notices instead of the white screen. When you enable debugging on WordPress, it also creates a debug.log file that you can check for any errors.
This is a log file that contains information about all errors or warnings. You can find it in the wp-content directory. Check the log file to identify what’s causing the issue and fix it.
For instance, if a plugin is causing the issue, the error will be logged in the debug file. You can then deactivate that specific plugin and report the issue to the developers.
Once you’re done, simply remove the code from your wp-config.php file to exit debugging mode. This is among the better ways to identify errors on WordPress websites, but it doesn’t always catch all errors that occur on your site.
Make sure you exit debugging mode. Many users leave it on accidentally, which results in degraded website performance and increased resource consumption.
Step #4 – Increase Your WordPress & PHP Memory Limit
The memory limit set on your server could also be what’s causing the issue. Every plugin on your site runs different scripts, consuming the server’s memory for execution.
In addition to this, WordPress also imposes a memory limit to prevent plugins from running inefficient processes that slow down your site. That being said, when a script needs more memory than it’s allowed, it can cause the White Screen of Death.
But before you try to increase the memory available, you may want to review the logs to determine exactly what’s consuming all this memory. Blindly increasing the memory is never recommended, so it’s important to carefully review the logs first.
To fix this, you can increase the amount of memory available to different plugins. Log into your server using SFTP, then find the wp-config.php file. In most cases – including on Servebolt – it’ll be in your public folder.
Open the wp-config.php file, and add the following line at the bottom:
define( 'WP_MEMORY_LIMIT', '64M' );
This enables WordPress to allocate up to 64 MB of memory for plugin scripts. In some cases, this might fix the issue. If it does not fix it instantly, try larger values, such as 125, 256, and 512. It can be that poor-performing code is using much more memory than usual, and so it will spring into life when more is available.
Keep in mind that on Servebolt, unless you define the limits, WordPress will always use the maximum memory available. Therefore, you should only follow this step if you previously limited the available memory.
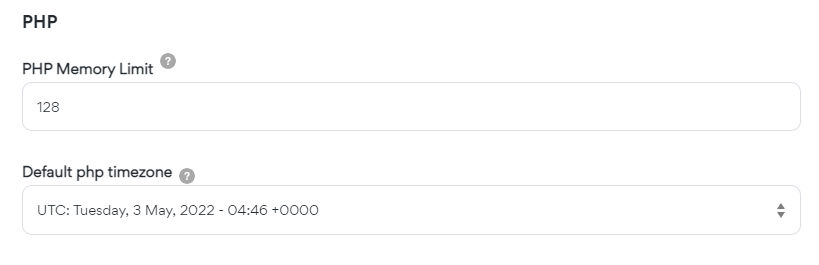
Alternatively, in the Servebolt Control Panel, you can also set a higher PHP memory limit. Simply go to your Site Settings, where you can change the PHP Memory Limit for your website, as shown below.
Step #5 – Recall The Last Changes You Made
Think for a moment about whether you made a change – installed & activated a plugin or changed a setting. The white screen of death usually occurs when PHP crashes (i.e., not related to the server).
As such, this could mean you’ve recently initiated a process in a plugin that caused this to happen (i.e., an image optimization plugin that has an efficient way of processing large media libraries, etc.).
You may want to consider using Git, as it makes it much easier to track changes and recall previous iterations. Git will store any changes you make, allowing you to recall them when needed.
If you’re able to identify what change it is that you made, it makes it easy to backtrack and take note that enabling that setting doesn’t work (and shouldn’t be attempted again) until the plugin or theme developer has been contacted to resolve the issue.
Step #6 – Disabling Plugins
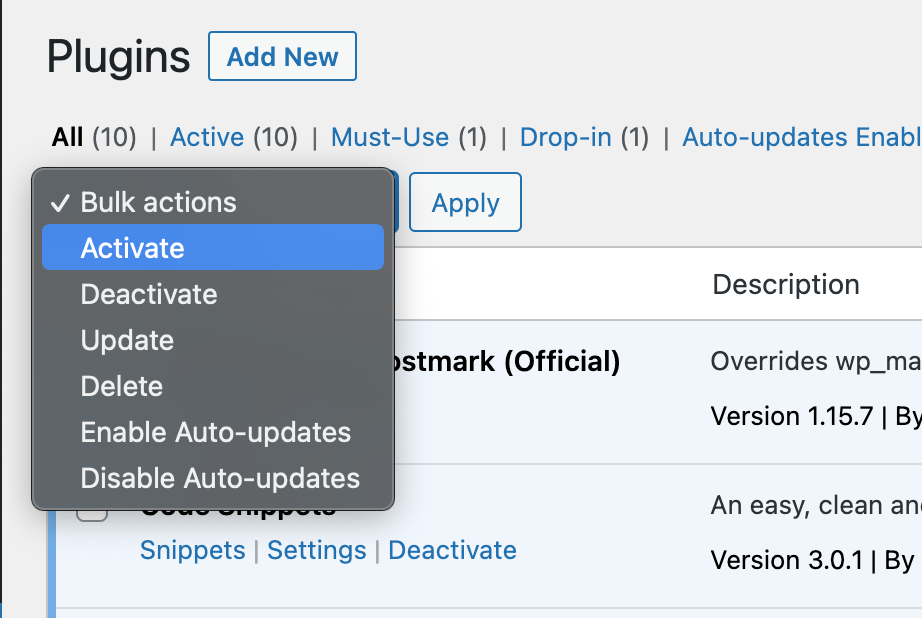
This is a slightly more tedious and less preferable method, which is why it’s so low. Troubleshooting each plugin individually is a hassle, but you can apply Bulk Actions, such as deactivating all installed plugins in one go.
If you can’t access the dashboard area, you will have to connect to your site using an SFTP client like FileZilla. Search for the wp-content folder, and you’ll see a directory named “plugins.”
Rename that to “plugins-deactivated” and save your changes. WordPress will no longer be able to find the folder to load up the plugins on your site. It will, therefore, automatically deactivate them completely. This is because WordPress looks for a folder called plugins; if it can’t find that folder, it automatically considers all plugins deactivated.
At this point, head back to your FTP client of choice and set the name of the folder back to plugins. You’ll now be able to get back into your admin area and can start activating plugins one by one to isolate the one(s) that are problematic.
Step #7 – Restore a Site Backup
If nothing seems to be working, you might want to consider restoring a backup of your site. Obviously, it’s best to create a backup of your current files (even though it may seem unreasonable) in case something goes wrong with your backup.
Servebolt performs daily backups of all files and databases for its customers. You can restore a backup for your site by simply contacting Servebolt through the site chat. The team will restore your backup at no additional cost.
Backups are stored for up to 30 days, with one backup per day stored for the last 14 days and a couple of weekly backups prior to that.
Debugging Option: Check for Issues with the Theme

The theme you use on your website could also result in the White Screen of Death in some cases. It might conflict with a plugin, or certain files may have been corrupted during an update. You may want to check for errors or replace the theme to check if that fixes the problem. As a last resort, a good temporary solution can be to switch to the default WordPress theme as you continue to debug.
What if I Can’t Access the Admin Dashboard?
If you’re getting the White Screen of Death when you try to access your Admin dashboard, changing the theme will obviously not be possible to do the same way.
Instead, you can use SFTP to access the site’s files.
Once you access the site, simply:
- Find the webroot folder, and then navigate to the wp-content directory.
- From there, search for a folder named “themes.” Look inside for the name of your active theme.
- Then, simply add the suffix “_old” after the theme’s directory name, and save the changes. WordPress will disable the theme (and if you have a default theme installed, switch to that theme by default).
- Try accessing your website again.
If you have SSH access, you can change the theme to another one using the WP-CLI.
In this example, it’s being changed to the theme Twenty Twenty-Two.
wp theme activate twentytwentytwo --skip-plugins --skip-themes
Note: This command skips initializing plugins and themes when making this change.
If your site’s working again, you’ll know that the problem is caused by your WordPress theme. At this point, it would definitely be time to report this to your theme developer so that they’re able to work on a fix – if the theme is still actively maintained. If it isn’t, then it would generally be advised to switch to another WordPress theme.
After Action Report – Contact Your Hosting Support to Take Preventative Measures
While the name of the error definitely makes it seem a lot more serious, getting your WordPress website back up & running when all you see is a white screen is generally a straightforward error to fix. If you’re still struggling to get this sorted, the next step would be to reach out to your WordPress hosting provider’s support team – and if you made the wise decision to host your site with us, simply log into your Servebolt account and chat with us so that we can help you get to the bottom of it together.
Not using Servebolt yet, but interested in managed hosting that’s empirically faster?
Try WordPress on Servebolt today:
- Scalability: In the real user workload tests, Servebolt delivered average response times of 65ms, 4.9x faster response times than the second best.
- The fastest global load times: Average page load times globally of 1.26 seconds put Servebolt at the top of the list of global WebPageTest results.
- The fastest computing speed: Servebolt servers provide unheard-of database speed, processing 2.44 times more queries per second than the average and running PHP 2.6 times faster than the second best!
- Perfect security and uptime: With 100% uptime on all monitors and an A+ rating on our SSL implementation, you can be assured your site is online and secure.
All backed by our expert team & ready to take for a spin on your free test Bolt today.