
The convention of setting a low WordPress maximum file upload size limit prevents you from uploading large files, plugins, and themes. This is generally good, as you shouldn’t be serving images greater than 25MB to website visitors anyway.
But, if you have a specific use case where you’re certain you need to be able to upload larger files – here’s exactly how to change the maximum file upload size limit in WordPress.
Why Increase the Maximum File Upload Size?
When you purchase hosting from a provider, they will assign a default file upload size. The limit usually varies, starting from 2 MB and going all the way to 500 MB or higher. At Servebolt, the default file size is 50 MB, though you can easily change it.
The reason why the default file size might seem (relatively) low is that uploading large files to the server could cause it to consume more resources. As a result, you could experience server timeouts or slow load times.
Note: It generally isn’t recommended to change the maximum file upload size. If you’re a Servebolt customer, feel free to reach out to our support team if you’d like to discuss your specific scenario and the reasons you’re considering making this change.
How to Check the Maximum File Upload Size Limit
WordPress is fairly intuitive and will automatically show you the file upload size. To check the maximum file upload size, just go to your Media Library, and click on Add New.
WordPress will show you the maximum upload size right below the “Select Files” button, as shown below.

As you can see, the maximum file size in this example is 50 MB. Here are some simple methods you can follow to change this.
Update the .htaccess file (our recommended method)
The simplest way to change the maximum file upload size is to update the .htaccess file if your server uses Apache. Adding a few lines of code to your .htaccess file is enough to change the maximum file upload size.
To access the .htaccess file, you can use a simple SFTP client like FileZilla. Then, just open your .htaccess file in a Notepad or any text editor, and then add the code below.
Note: You can also edit your .htaccess file using SSH. Learn more.
php_value upload_max_filesize 500Mphp_value post_max_size 500M
It’s important to understand what these mean first. As you can probably guess, these are the default PHP values that control the size of either the file or the entire post.
The php_value post_max_size 500M indicates the maximum file size for the entire POST request, whereas the other indicates the max upload size for each file that you upload. POST is the most common method used to send files to the server, if its size is smaller than the filesize the upload will fail.
Changing the php.ini file settings (not for Servebolt users)
Finding the php.ini file
The php.ini file can be located in many different places, and on some server types use different php.ini files for each website. There is also a different php.ini for the CLI (Command Line Interface).
Most often, the php.ini is found in one of these two places
/etc/php.ini
/etc/php/[VERSION NUMBER]/[MACHINE TYPE]/php.ini
Make sure you are editing the right one by searching for it.
For the command line
You need to first ssh to the server if it is remote or open the terminal if it’s local. Running the following command will reply with all lines that mention php.ini
php -i | grep php.ini
This will give a response like:
Loaded Configuration File => /etc/php/8.0/cli/php.ini
Where the bold information is the path to where the loaded php.ini is
For the web server
In the webroot create a file called test.php and enter this single line
<?php phpinfo(); ?>
Then go to your website and open the file. I.e. https://yoursite.com/test.php it will display all the configuration info. In the first box, you will find the php.ini information. Don’t forget to delete this file after use, it exposes sensitive information.

Note: Depending on your server setup, it may be possible that the server and the command line are running on two separate versions of PHP, and will almost definitely be using different php.ini files (or the php.ini files will override each other).
Edit Your php.ini File
The php.ini file is used to add changes to the default PHP settings. In general, the php.ini file contains instructions for managing file timeouts, resource limits, and maximum upload limits.
Note: If you’re a current Servebolt customer, editing the php.ini file directly isn’t possible – we recommend using the .htaccess for overrides of configuration changes.
Normally, you can only edit your php.ini file as a super user. As such, you will need SSH or terminal access with sudo capability. To edit the file, use something like nano to open the path to the php.ini
sudo nano /etc/php/7.4/apache2/php.ini
To change the maximum file upload limits, just add the following code to the end of your php.ini file:
upload_max_filesize = 100Mpost_max_size = 200Mmemory_limit = 128M
Once you’re done making these changes, just save the file.
In some cases, access to the php.ini file might not be available. To get around this, it can be possible to modify the .user.ini file. The .user.ini file is found in your webroot directory
If it’s possible to use on your hosting, just create a new file with the same name, and add the following code to it:
upload_max_filesize = 100Mpost_max_size = 200Mmemory_limit = 128M
Modify the Max Upload File Size in NGINX
Note: This method will not work on the Servebolt Cloud but is an option if you run WordPress in an NGINX environment and have access to your nginx.conf file.
Nginx is an internet-facing web server like Apache. NGINX is capable of handling compression, caching, and SSL negotiations, so it’s much faster.
To change the file size, you’ll have to modify the nginx.conf file as well. To change the file size, go to /etc/php/[php version]/fpm/php.ini.
Once you do that, you need to enable the changes. To do that, you need to restart PHP-FPM, which you can do by entering the following code in your terminal:
sudo service php8.0-fpm restart
If you’re using PHP 7.4, for instance, you should replace 8.0 with 7.4. Once you’re done, the next step is to use the client_max_body_size to change your max file upload size limit.
This change must be declared in the nginx.conf file. The file path to follow is /etc/nginx/nginx.conf.
Here’s how you can add these:
- HTTP block: If you declare this here, it’ll affect all sites hosted on your server.
- Server block: Here, the file change directive will affect only a particular app or site on the server.
- Location block: This only affects the specified directory.
Changing the max file upload size on WordPress Multisite
When using WordPress multisite, there is a secondary option in the WordPress admin dashboard to set a maximum upload size for all of the sites in the multisite.
Note: This will not override the PHP settings’ maximum upload size limit, so you should not set a limit that is higher than the server’s maximum upload size limit itself (as it will be ignored by the server). We suggest using the methods described earlier to alter the configuration on your server directly.
WordPress Multisite defaults to 1.5MB max upload size; this is shown on the WordPress Network Admin Settings as 1500KB.
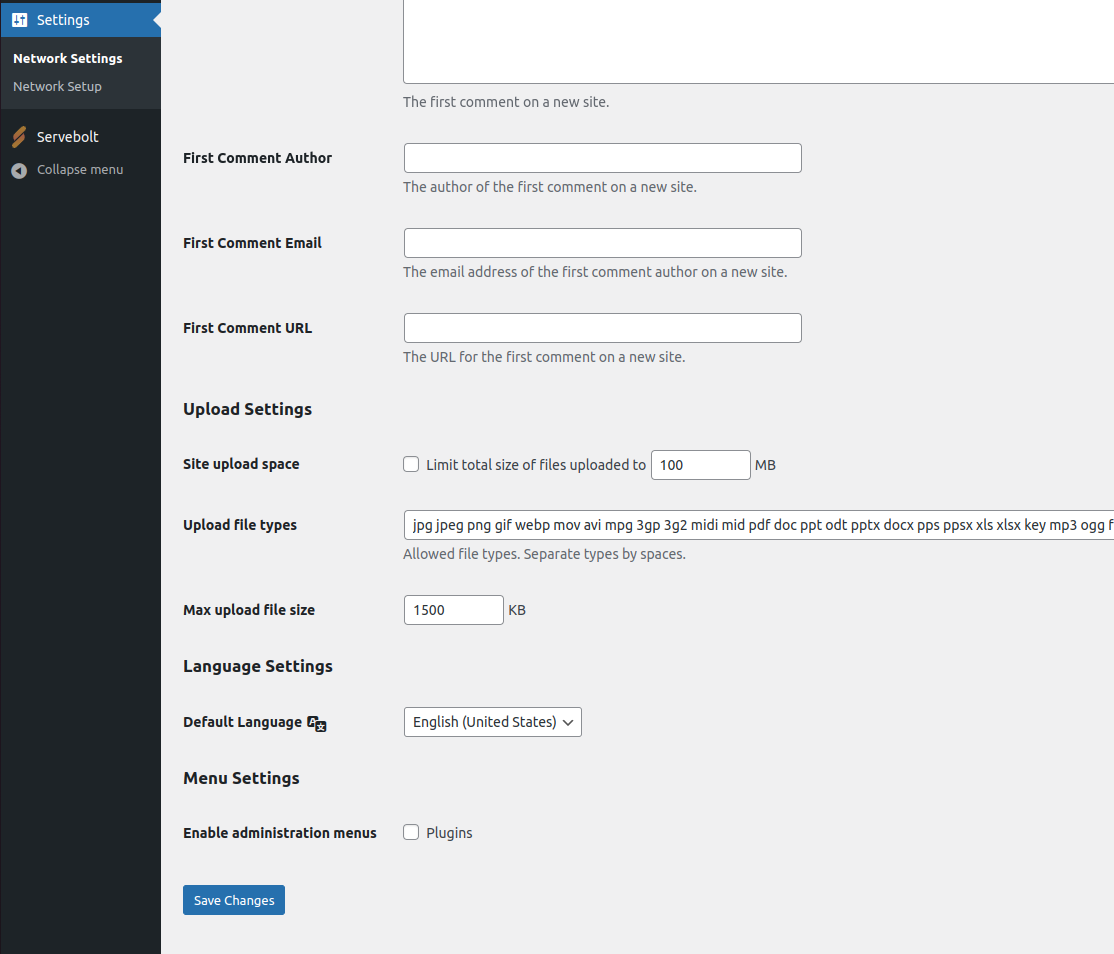
To adapt this setting, go into the WordPress admin screen => My sites => Network Admin => Dashboard. On the following screen, click Settings => Network Settings and scroll down to the bottom to find the field labeled as “Max upload file size” and update it to be what you want. Each 1000 is 1 MB, so 50MB would be 50000KB. Once you have entered the value you want, click the blue “Save Changes” button.
A Word of Warning
Please note that on many occasions, when users request a larger file size upload, it is because they have not been taught how to resize an image before sending it to the server or that they are choosing the wrong file type, causing it to be much larger than needed.
For example, they might be uploading RAW or TIFF files for photos where JPEG would be significantly smaller. Or perhaps they are uploading photos with an extremely high resolution (higher than would be recommended to serve to website visitors) when, in fact, resizing to a smaller size would be the better way to handle this.
As a site owner, always double-check if this is a training issue or something that would warrant making changes to your server configuration.
Of course, the old internet adage is true, “performance is king,” so having very large image files will kill that prospect. Depending on where the website user is, it could take a significantly longer time to serve the page if the images are large, as well as cost the user a lot more out of their data bundle. Longer wait times or costly pages will increase the chances that the visitor will not return. Make sure you serve efficient images.
At Servebolt, with our fully-managed Accelerated Domains service, we make this easy by resizing images on the fly based on browser size so your site only ever serves images in the sizes they should be.
Summary – There Are Several Ways to Increase Your Maximum File Upload Size
As you can see, there are several ways to increase the maximum file upload size. You can increase it through the .htaccess file or by updating the php.ini file. But, if you’re not very technical, the best approach is to use a plugin (as shown above) to increase the maximum file upload size very quickly and easily.
Interested in managed WordPress hosting that’s empirically faster? Try the Servebolt way:
- Scalability: In the real user workload tests, Servebolt delivered average response times of 65ms, 4.9x faster response times than the second best.
- The fastest global load times: Average page load times of 1.26 seconds put us at the top of the list of global WebPageTest results.
- The fastest computing speed: Servebolt servers provide previously unheard-of database speeds, processing 2.44 times more queries per second than the average and running PHP 2.6 times faster than the second-best!
- Perfect security and uptime: With 100% uptime on all monitors and an A+ rating on our SSL implementation, you can be assured your site is online and secure.
All backed by our expert team. Take Servebolt for a spin on your free test Bolt today.