Introduction
Cleaning a hacked website can be a time-consuming process. This tutorial takes you step by step through this process. It does however assume you have some knowledge about SSH, and how you can use that to connect to your Bolt.
Whenever commands are provided in this article, it assumes you’re located at the root of your WordPress installation. On every other occasion, this will be told.
Steps to Take
Step 1: Contact Servebolt Support
The first step is the easiest. Hop on the chat and come say hello! This way our support team can assist you with figuring out what happened. Also, they can make sure that the site will no longer be accessible from the Internet. That way you won’t be responsible for anything bad happening to your visitors and you can clean your hacked website without their interference.
Step 2: Change your SSH and SFTP Passwords and API Keys
Once that has been taken care of, we need to make sure that only you have access to the SSH and SFTP environment of the site. To do this, select the environment in question in your Admin Panel. In the following screen click on ‘Reset SSH/SFTP Password’. This will load a new screen that lets you generate a new secure password. Don’t forget to save this to your password manager, as this will be the only time you can see and copy the password. Not even the Support team can assist you in retrieving it once you’ve closed this screen.
Updating your API keys is also crucial, but it’s only one piece of the puzzle when it comes to securing your website. You can do this by clicking the ‘API’ entry in the menu. Click the ‘Replace Key’ button to update your API key, rendering the old one useless.
Step 3: Change the MySQL Credentials
With every hack, it’s best to presume that everything about your site is known to the attacker. This means everything in the configuration file as well. And that would include your MySQL password. So let’s set a new password in the Admin Panel for your database and update the configuration with the value we picked.
We start with setting a new password. Inside the Admin Panel of your Bolt, click on databases. This will get you an overview of all active databases for your Bolt. In the row belonging to the database of the site we’re cleaning up, select ‘Set Password’. In the next screen, click ‘Generate password’, copy the generated password and click ‘Change Password’. Next, we need to update the password used by the site itself, so it matches again. To do this, use the config set command. If our newly generated password would be DP5!YK3*YMCX)d5, the command would be:
wp config set DB_PASSWORD "DP5!YK3*YMCX)d5"If all went well, you should be receiving the message Success: Updated the constant 'DB_PASSWORD' in the 'wp-config.php' file with the value 'DP5!YK3*YMCX)d5'
Step 4: Download a Clean Version of the WordPress Core
Downloading a clean copy of WordPress can be done by utilising the core download command built into WP CLI. Normally this wouldn’t run on an existing WordPress installation. But we’ll be adding the --force flag to the command, overwriting the existing site like this:
wp core download --forceIf all goes well, you should be getting some feedback on the process, followed by a line stating Success: WordPress downloaded.
Step 5: Verify that WordPress is Clean
The previous step should have cleaned every altered file in your WordPress core. This will not take care of any files that may have been added. We can find those easily by comparing the installed files to a list of what should be there. We do this with the following command:
wp core verify-checksumsIf nothing out of the ordinary has been found, you’ll get a message saying: Success: WordPress installation verifies against checksums.
If files are found that are not supposed to be there, the message instead will be like this for every file found: Warning: File should not exist: wp-includes/hacked-file.php. Any file found this way most likely shouldn’t be there. So unless you’re 100% sure that you’ve placed this file yourself, it is best to remove it.
Step 6: Check for Available Updates on WordPress, the Plugins and the Theme
Common entry points for hackers are outdated plugins, themes or even an outdated WordPress itself. So after we know the WordPress core files are clean it’s time to make sure everything is up to date. For this, we leverage several checks that the wp doctor command can execute for you like this:
wp doctor check core-update plugin-update theme-updateThis will produce an overview of available updates for your WordPress core, installed plugins and installed themes. If we are certain that updates can be applied safely, we can run them like this:
For Plugins:
Run the command:
wp plugin update --allThis will update all plugins that have an update available. If you wish to exclude certain plugins, you can use the –exclude flag as explained in the documentation.
For Themes:
Run the command:
wp theme update --allSimilar to plugins, you can use the –exclude flag to exclude themes from getting updated.
Update WordPress:
For updating WordPress itself we can use this command:
wp core updateStep 7: Verify if all Plugins are Clean
Our next step is to verify that no code has been added to any of the existing plugins. We do this by leveraging the following command:
wp plugin verify-checksums --allThis will either give you a green success message or throw an error message like this:
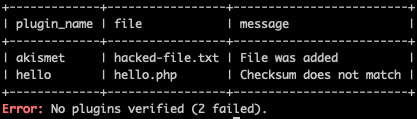
In most cases you can safely remove files that have been added. Altered files should be replaced by a clean version of the plugin. Both of these can be done by re-installing the plugin in question and overwriting the existing files like this:
wp plugin install <plugin-name> --forceUse the field value under plugin_name from the earlier test to reinstall any plugins that do not match with the checksum they should be matching. The --force flag will ensure that the plugin gets fully overwritten.
Step 8: Check for PHP files in the Uploads Folder
In most cases, there is no need for PHP files to be located in the uploads folder. Some plugins do store files there though, so always check if that’s the case if you locate anything.
To locate these files easily, we can use this command:
wp doctor check php-in-uploadIf all goes well, you will get the message: No PHP files found in the Uploads folder.
But if anything is there, you’ll get the message PHP files detected in the Uploads folder instead. In that case, look them up by using the find command like this:
find wp-content/uploads/ -name "*.php" -printAll files listed should be examined to see if they are a legitimate part of your site, or if they can be safely removed. When in doubt: move them to the /private/ folder on the Environment first before removing them indefinitely
Step 9: Check for Unknown Folders and Files in the wp-content Folder
We now know that the installed plugins and upload folders should be clean. Next would be to manually search through the folders in the wp-content folder. Find out if there is anything added that shouldn’t be there. Since every site is different, it’s hard to tell beforehand what should or shouldn’t be there. But looking at the folder structure, naming of files and their contents should be enough to tell you whether something should be there or not. And when in doubt: reach out to our Support team and they can look along with you!
Step 10: Check for Unknown Users and Administrator Accounts
Depending on how many users a site has, this can be either very quick or it might take up more time. If you don’t have many users, you can get a quick overview of them like this:
wp user listIf the list is a long one, searching through administrators can be done quicker, like this:
wp user list --role=administratorReview all entries, and see if there are any users (especially administrators) that you don’t recognize. If there are, consider removing them by using this command:
wp user delete <ID>In this case, the ID field should be the ID listed in the overview you generated earlier on.
Step 11: Reset all Passwords for Administrators and Users
When a site is hacked, it’s common to assume that everything on it has been compromised. That includes access to administrator accounts. It is, therefore, safe to reset all those accounts, so old passwords can no longer be used. We do this by issuing the following command:
wp user reset-password $(wp user list --format=ids --role=administrator)Depending on the kind of users available on the site, you might consider resetting passwords for all accounts or sending them an email to encourage them to do so themselves. If you want to update all passwords forcefully for users, you can use the following command:
wp user reset-password $(wp user list --format=ids)Step 12: Shuffle all WordPress Salts
One of the final steps would be to update (or shuffle) the WordPress Salts. You can read more about them in this article. Shuffling them is rather easy using the following command:
wp config shuffle-saltsStep 13: Reactivate the Site
Now everything is safe and secure again, reach out to our Support team. They’ll happily check the site and reactivate it, so it can be used again!
Conclusion
By completing these steps, your site should be in a clean and secure state again. Keeping everything updated regularly will help maintain this security! But taking additional precautions will never hurt. If you wish to learn more about securing your website and WordPress security plugins in general, don’t forget to check out this article about using security plugins written by our colleague Andrew!