Troubleshooting issues in the browser is a difficult thing to do when you don’t have all the information as the one encountering the issue. In order to solve issues in the browser, it is important to capture as much information as possible to properly diagnose an issue. Luckily, there’s a solution available in all modern browsers with generating a HAR. A HTTP Archive (HAR) records all web browser requests including the request and response headers, the body content, and the page load time.
Our Support Team may, for instance, may request that you record a HAR file. Or a log of network requests while that issue you’re experiencing is occurring. The HAR file will help us to provide further analysis. But how do you generate a HAR file?
Note: A HAR file can include sensitive details such as passwords, payment information, and private keys. This allows anyone with the HAR file to impersonate your account and have all the information that you submitted while recording (passwords, personal details, credit card numbers and such).
Manually remove sensitive information from a HAR file via a text editor before providing this file to a Support Team.
Instructions for Chrome or Brave browser
Time needed: 10 minutes
This guide will explain how to record a HAR file and how to save it.
- Open the Google Chrome or Brave browser
The first step requires you to open the site where you’re experiencing the issue. Not the page itself just yet.
- Open Inspector
Right click anywhere on the page in the browser and select the menu option Inspect. This will open up the Inspector Panel.
- Select the Network tab.
On top of the Inspector Panel you’ll find a couple of menu items. By default you’re looking at the Elements tab, but you’ll want to click on the Network tab.
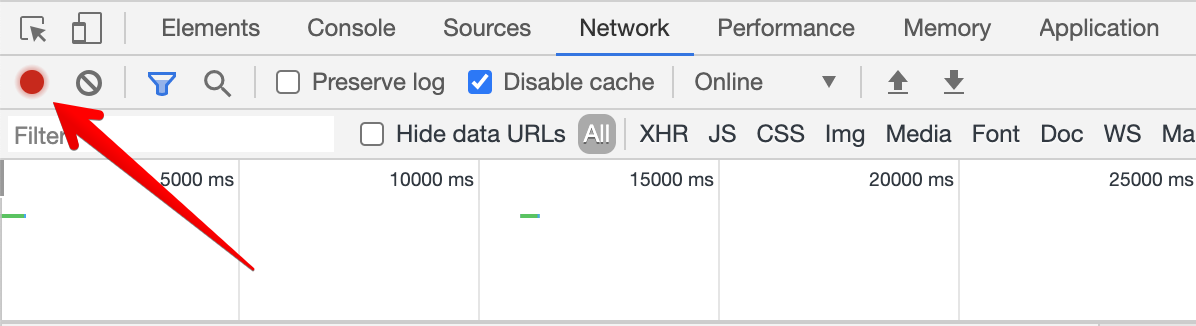
- Start recording your session
In the upper left corner of the tab you’ll find a red recoding button. If it is grey, click it once to start recording.
- Make sure Preserve log is turned on
Check the box Preserve log.
- Clear out any existing logs
Click the Clear button to clear out any existing logs from the Network tab.
- Reproduce the issue
Navigate to the page where you’re experiencing the issue and reproduce the issue that you were experiencing before – while the network requests are being recorded.
- Save as HAR with Content
Once you have reproduced the issue, right-click anywhere on the grid of network requests, and select Save as HAR with Content, and save the file to your computer.
- Send your HAR file to Support
The HAR file you’ve just recorded and saved can now be sent to the Support Team that have requested this file. Again, be aware of the note on top of these instructions.
Concluding
And that’s it. In 9 simple steps you just created a HAR file. A HAR is also a good tool to debug (weird) network performance issues for instance, but it’s not really meant to debug front-end performance. I’d recommend looking into wp doctor for that, for instance.
Happy debugging!