Caching of HTML can significantly reduce resource usage, and provide scaling and performance benefits. As opposed to static resources, like Javascript, CSS, and images – HTML is often tailored to the individual who views it. Therefore HTML caching, also called full-page caching, is not trivial and there are several pitfalls to avoid.
This article explains how to make HTML caching work with WordPress and Cloudflare using both Page Rules and Cache Rules.
There are three main components in a successful Cloudflare HTML cache setup:
- A way to tell Cloudflare what to cache. For most setups, this is done by enabling ‘
Cache everything’ in combination with ‘Bypass Cache on Cookie’ in a Page rule or Cache rule that matches every page on your site. - A way to exclude pages that should never be cached. This is also done via Page Rules or Cache Rules in Cloudflare, by setting the cache to ‘
Bypass‘ or ‘Standard‘. - A way to invalidate the cache when content is updated. This is usually when things become tricky and hard, but our plugin Servebolt Optimizer takes care of this for both WordPress and WooCommerce.
The required Cloudflare Features for HTML full-page caching
The following are the features you need to have to make HTML caching work with Cloudflare. By default, Cloudflare is not caching HTML.
Page Rules and Cache Rules
To enable the caching of HTML you can use Page Rules or Cache Rules and more specifically the ‘Cache Everything’ setting. With this, you can enable caching of HTML by making a page rule that caches everything.
There’s a slight problem with that though, the precondition is that all content that is cached by this rule has to fulfill two criteria. The HTML has to be static, meaning that it does not change over time (like a news front page for example is continuously changing). The other criterion is that the content is anonymous. This means that it is the same piece of content that is intended for any visitor to this resource. In sum, this means that the ‘Cache everything’ settings alone are not enough.
Cache Everything
The risk of caching everything is always that you might cache content that is not intended for the next visitor. For example, if you log into your WordPress admin, cache everything blindly, and visit your front page. A next random visitor would get to see the page that only was intended for you, with the WordPress edit bar at the top. That’s why you need the ‘Bypass Cache on Cookie’ setting.
Bypass Cache on Cookie
To log into a website, cookies are needed to maintain a link between your computer and the server. When you have this cookie, it is sent with every request you make to the server. This means that you can tell the server to pass the request through to the origin server, given the user has a certain cookie. With this enabled, you can deliver cached responses to anonymous visitors, while you as an administrator, or a logged-in customer in WooCommerce are getting served a tailored HTML page that will not be cached.
The Servebolt Optimizer plugin takes control over what to cache and what not to cache, and provides a cookie named ‘no_cache’ if content should not be cached. Your WordPress/WooCommerce setup can rely on our plugin to set the correct settings, instead of all the various cookies WP (wp-*, wordpress-*, comment_*, woocommerce_*). The other benefit is that the ‘no_cache’ cookie also works with the upstream Servebolt origin web server.
Which Cloudflare subscription should I choose?
You can have HTML caching set up and working with any Cloudflare subscription, but some plans offer more options than others For example Cloudflare Business is the only subscription that includes the ‘Bypass Cache on Cookie’ setting for Page Rules.
Cloudflare Free
HTML caching can be set up with Cloudflare Free but with limited Page Rules and Cache Rules. 3 Page Rules and 10 Cache Rules included.
Cloudflare Pro
If you need more rules, more features, and have security in mind, Cloudflare Pro can be the plan for you. 20 Page Rules and 25 Cache Rules are included.
Cloudflare Business
Servebolt is an Enterprise Cloudflare partner and provides custom Cloudflare Business plans. The Servebolt business plans by default include a feature called Tiered Caching. This is normally a paid add-on in the Argo Routing application and is an essential performance-enhancing feature if you are serving the US or other large geographic regions.
Alongside added features and benefits, Cloudflare Business includes 50 Page Rules and 50 Cache Rules.
Accelerated Domains
Accelerated Domains is a product maintained and owned by ourselves that offers amazing caching/security and scalability benefits out of the box. Meaning that you don’t have to set up any rules yourself, as we have already done it for you.
How to configure Cloudflare for HTML caching for WordPress
When you are planning to leverage Cloudflare for HTML caching, we recommend that you reduce the number of plugins you use for optimization, aggregation, caching, and such on your website.
One reason for this is that the more plugins and features you use, the more complex it gets – and the harder it gets to resolve issues. Another reason is that optimizations are largely done much more efficiently on the Cloudflare edge than by using PHP in WordPress. On the Servebolt Cloudflare Business plans you’ll also get Unlimited workers included, which can be leveraged to optimize fonts, resize images, and so forth.
Method 1. HTML caching with Page Rules (Cloudflare Business)
In this first method, you will need a set of rules in the Page Rules section of Cloudflare, that tell Cloudflare how to process various requests. The first page rule that matches the incoming request is the one that will be applied.
The following example is an absolute minimum configuration that does the required basics to make a standard WordPress site function as intended.
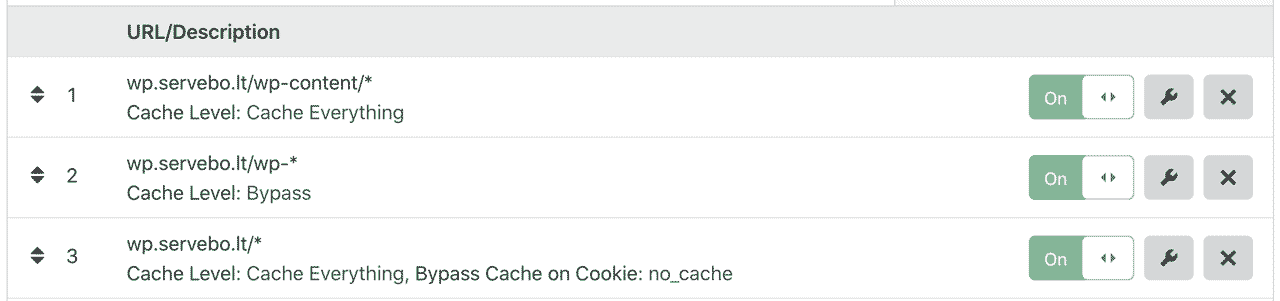
Explanation for these rules:
Rule 1 enables ‘Cache Everything’ for all requests going to anything in the /wp-content/ folder, this will include your themes and images.
Rule 2 Bypasses the cache for all requests starting with /wp- (except wp-content, which is dealt with by the first page-rule). This makes it possible for you to log in (/wp-login.php), and work in the admin (/wp-admin/*) without running into caching issues. When you log in to the Admin Panel, you will get the no_cache cookie.
Rule 3 applies the default policy for the rest of the requests. This is the rule that enables HTML caching for everything, with the exception of bypassing the cache if you have the no_cache cookie.
If you’re not using our Servebolt Optimizer plugin, it is recommended to replace no_cache with wp-*|wordpress-*|comment_*| woocommerce_* in the bypass rule.
Additional required rules for WooCommerce, or other dynamic endpoints on your site
If you’re running WooCommerce, there are a couple more endpoints that need to be excluded from caching. The cart and checkout are by design dynamic, and can not be cached. The paths may vary, so you need to check what paths are in use for your cart and checkout.
The following is a standard example where we have added two more page rules (the first two):

The checkout often involves multiple steps, therefore the /checkout/* wildcard rule is used to bypass the cache. And this example has the cart page on /cart.
Method 2. HTML caching with Cache Rules
HTML caching by Cloudflare can be achieved by only using Cache Rules as well. However, if you want to use a combination of Page Rules and Cache Rules, then it’s important to keep in mind that Page Rules will be parsed before Cache Rules. This means that rules you set as Page Rules will apply before the Cache Rules you set.
This is also not an example of how you can use both Page Rules and Cache Rules together, but rather an example of how it can be done. If you copy the rules set below, make sure that you either only use the Page Rules method or our Cache Rules method to enable HTML caching.
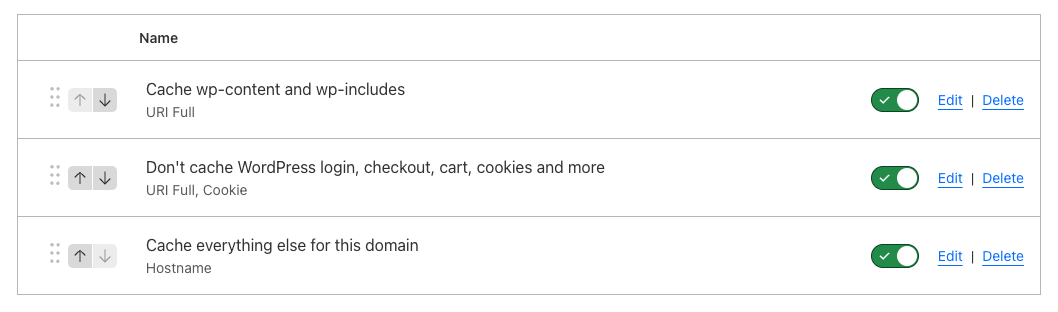
This is how your Cache Rules should look, parsed top to bottom.
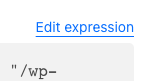
If you want to use the rules we have set above, you can copy the “Expression Preview” shown below and paste it into the “Edit expression” section in Cloudflare when you are creating a Cache Rule.
Cache Rule 1 – Cache wp-content and wp-includes
In this cache rule, we tell Cloudflare to cache assets in folders /wp-content/ and /wp-includes/.
Expression Preview
(starts_with(http.request.full_uri, "/wp-content/")) or (starts_with(http.request.full_uri, "/wp-includes/css")) or (starts_with(http.request.full_uri, "/wp-includes/js")) or (starts_with(http.request.full_uri, "/wp-includes/images")) or (starts_with(http.request.full_uri, "/wp-includes/fonts")) or (starts_with(http.request.full_uri, "/wp-includes/blocks"))When you have set the Cache Rules needed for your website you also need to tell the rule to be ‘Eligible for cache’.

Cache Rule 2 – Don’t cache WordPress login, checkout, cart, cookies, and more
In this cache rule, we tell Cloudflare to not cache WordPress login pages, account pages, checkout, cart, and other cookies that shouldn’t be cached in a WordPress/WooCommerce setup. Please keep in mind that if you have paths for your website that you don’t want to cache, this is where you set them.
Expression Preview
(http.request.full_uri contains "/wp-admin") or (http.request.full_uri contains "/wp-login.php") or (http.request.full_uri contains "/checkout/") or (http.request.full_uri contains "/cart/") or (http.request.full_uri contains "/my-account/") or (starts_with(http.request.full_uri, "/graphql")) or (starts_with(http.request.full_uri, "/xmlrpc.php")) or (http.request.full_uri contains ".txt") or (http.request.full_uri contains ".xlst") or (http.request.full_uri contains ".xml") or (http.cookie contains "no_cache") or (http.cookie contains "wp-") or (http.cookie contains "wordpress-") or (http.cookie contains "comment_") or (http.cookie contains "woocommerce_") or (http.cookie contains "PHPSESSID")When you have set the Cache Rules needed for your website you also need to tell the rule to be ‘Bypass cache’. This is very important.

Cache Rule 3 – Cache everything else for this domain
Lastly, you will tell Cloudflare which domain to cache everything else for.
Expression Preview
(http.host contains "yourdomain.com")When you have set the Cache Rules needed for your website you also need to tell the rule to be ‘Eligible for cache’.
Further Customization of cache
All sites are different, and there are usually certain paths and requests you’d like to exclude from caching. Both plugins and themes sometimes require customization. Also, API requests are generally not something you’d like to cache.
You’d also often want to apply cache policies that are efficient for your site. There are no general rules, but online testing tools almost always recommend setting very far future cache expiry dates.
The Edge Cache TTL is a setting that tells Cloudflare how long they should keep an asset in their cache. For example for static content, it is often a good idea to set this to the maximum setting (a month). For HTML you might want shorter times depending on your use case. Ask yourself the question: “When and how often do you want this HTML to be refreshed?” A good thing about the Edge Cache is that we can control it, and purge items from it when required. This can be done either through the Control Panel or by using our Servebolt Optimizer plugin, which will automatically refresh relevant content.
We can also control the Browser Cache TTL using Page -and Cache Rules. The Browser Cache is special because we can not control it like the Edge Cache. It cannot be cleared by clicking a button. The only way to bypass the browser cache is to force-reload a page (which will make the browser reload the page from the server), or let it expire. The upside of the browser cache is that it is the cache closest to the users – so it will make HTML load in just fractions of a second because it doesn’t require any network traffic.
There is also an Origin Cache Control setting that allows you to control the CDN cache from the origin web server. This is a very nice feature for advanced users that know how to manipulate headers and instruct the Edge cache using headers.
How to purge the Cloudflare cache
Let’s start with how you should avoid purging the cache if you want to maintain the best possible performance at all times.
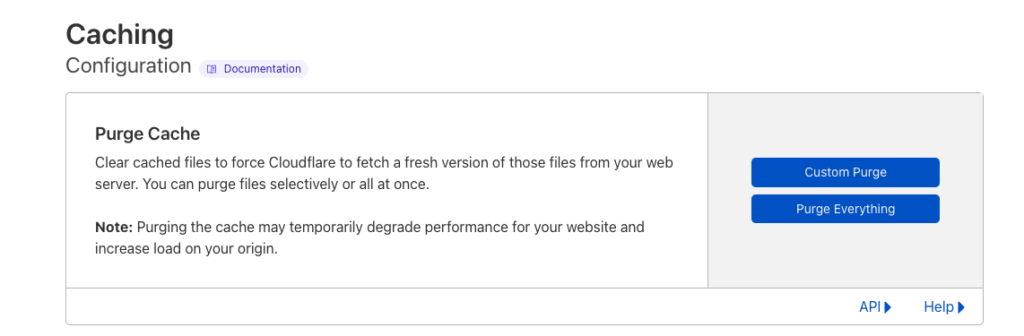
Cloudflare Dashboard – Cache App, Purge Cache section
The Purge Everything button is very convenient, but on the other hand, it is a performance killer. The button is very efficient, and does exactly what it says: it purges every cached item for your entire zone (domain) on every CDN node in the Cloudflare network. That means that all CDN nodes need to rebuild the cache by fetching all assets again from the origin. That takes time and degrades performance for the end user until everything has warmed up again.
Therefore the better option is to use the Custom Purge feature, if possible. This feature only purges the cache for the specific paths, instead of also purging all your static elements and all other HTML pages.
Automagically purge via the Servebolt Optimizer plugin
The Servebolt Optimizer plugin supports purging the Cloudflare cache automatically when content is updated. The plugin is able to do this by hooking into the actions that run every time you update a post, page, product, or any other post type. We do the same thing when you update taxonomy terms like categories, product categories, tags, etc.
The real magic in Servebolt Optimizer is that we in addition to purging the post itself also purge the term(s) it belongs to. That way you can make sure that for example the product category page is updated if you update the price of a product in that category.
The setup of Servebolt Optimizer for WordPress and the Cloudflare Cache Purge feature is really simple and can be done via wp-admin or by using the really simple WP-CLI commands that come with the plugin. The Servebolt Optimizer also allows for customization through filters and actions if you have a site-specific need that the plugin does not automatically handle.
If you need to purge manually this is also possible through both WP-CLI (wp help servebolt for our plugin CLI-manual) and the admin bar when the integration with Cloudflare is set up.
How to verify that HTML caching is working
Lastly we’ve written a separate article about Servebolt’s Caching and Cache policies that help you verify whether HTML caching is working.