In this how-to, we will guide you on how to set up server-side cron. This guide assumes that you already have a basic understanding of cron jobs. If you need more information about cron jobs, please refer to this article.
By default, WordPress uses WP-Cron, which runs cron jobs over HTTP when users visit your website. This means that scheduled tasks only run when someone visits your website. This can be a problem for high-traffic websites and/or multisites because it triggers on every page load, creating a queue of tasks that compete for server resources. This will also lead to a problem with tasks that need to be executed at an exact time. This system isn’t designed to be punctual, just to get the job done. Or as the official documentation states:
“So while you can’t be 100% sure when your task will run, you can be 100% sure that it will run eventually.”
Server-side cron, on the other hand, is triggered by your web server on a schedule that you set. This means that your scheduled tasks will run regardless of whether or not anyone is visiting your website or multisite. This will improve the performance of your site and ensure that your scheduled tasks always run on time.
How to set up server-side cron with Servebolt Optimizer
With Servebolt Optimizer, setting up server-side cron has been made easy, seamless, and efficient.
These are the steps needed for setting up server-side cron using Servebolt Optimizer:
WordPress dashboard method:
- Log in to your WordPress dashboard.
- Go to Servebolt Optimizer -> Performance Optimizer -> Advanced.
- Check the box that says run WP-Cron from UNIX cron and click save changes.

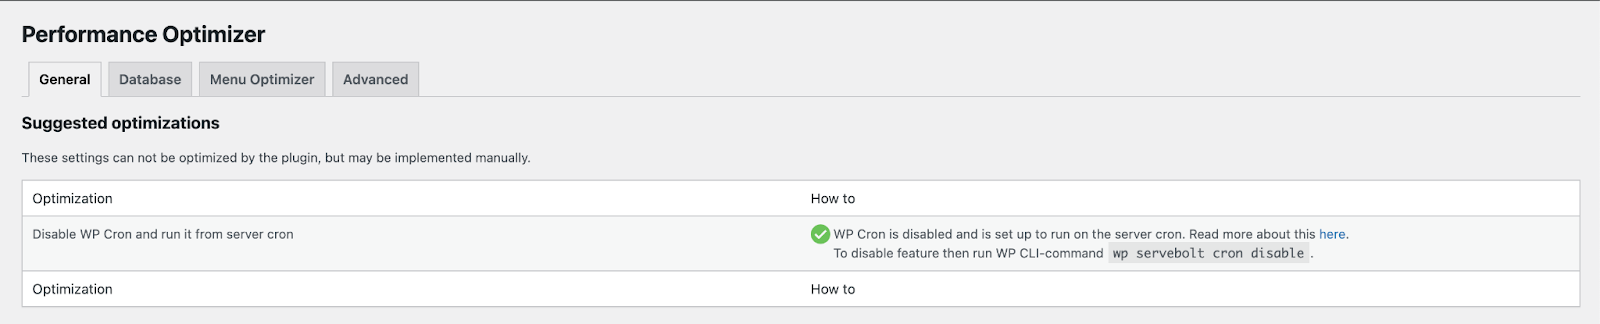
You can also verify that the default WordPress cron is disabled by logging in to your WordPress dashboard -> Servebolt Optimizer -> Performance Optimizer -> General:
A cron job will also be added to the Control Panel under the cron settings. It will look something like this:
Time interval: 4,9,14,19,24,29,34,39,44,49,54,59 * * * * (These numbers will be randomly generated for your site to run every 5 minutes)
Command: flock -n ~/.wp_cron.lock wp cron event run --due-now --path=/kunder/serveb_8672/userte_1364/public --quiet
SSH method:
- Install and activate the Servebolt Optimizer plugin on your site or multisite network.
- Log in to your site using SSH with the use of a terminal. PuTTY can be used if you are using Windows.
- Run the following command from your webroot
~/public:
wp servebolt cron enable
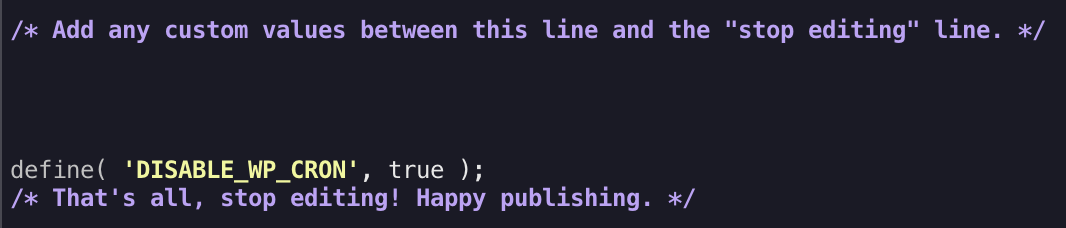
This command enables server-side cron jobs and automatically disables cron from running directly in WordPress by adding the following line of code to your wp-config.php file:
define('DISABLE_WP_CRON', true);
Using a script
You can also set up server-side cron with a script. However, we recommend using Servebolt Optimizer to enable this feature. However, if you still prefer to use a script, here are the steps involved:
- Log into your site using SSH or SFTP.
- Add the following line to your
wp-config.phpfile just before the line that says “That’s all, stop editing! Happy blogging” located in ~/public:
define( 'DISABLE_WP_CRON', true );
- Create a new file in your user root directory with the .sh extension. For example,
run-wp-cron.sh. - Copy and paste the following code into the file. The script was originally made by Bjørn Johansen and modified by Servebolt:
#!/bin/bash

# Copyright © 2015 Bjørn Johansen

# This work is free. You can redistribute it and/or modify it under the

# terms of the Do What The Fuck You Want To Public License, Version 2,

# as published by Sam Hocevar. See http://www.wtfpl.net/ for more details.

WP_PATH="$HOME/public"

# Check if WP-CLI is available

if ! hash wp 2>/dev/null; then

    echo "WP-CLI is not available"

    exit

fi

# If WordPress isn’t installed here, we bail

if ! $(wp core is-installed --path="$WP_PATH" --quiet); then

    echo "WordPress is not installed here: ${WP_PATH}"

    exit

fi

# Get a list of site URLs

if $(wp core is-installed --path="$WP_PATH" --quiet --network);

then

    SITE_URLS=`wp site list --fields=url --archived=0 --deleted=0 --format=csv --path="$WP_PATH" | sed 1d`

else

    SITE_URLS=(`wp option get siteurl --path="$WP_PATH"`)

fi

mkdir -p ~/.cron-lockfiles/

# Loop through all the sites

for SITE_URL in $SITE_URLS

do

    # Run all event hooks that are due

    for EVENT_HOOK in $(wp cron event list --format=csv --fields=hook,next_run_relative --url="$SITE_URL" --path="$WP_PATH" | grep now$ | awk -F ',' '{print $1}')

    do

       FLOCK_INDICATOR=$(echo -n "$SITE_URL-$EVENT_HOOK" | md5sum | awk '{print $1}')

        flock -n ~/.cron-lockfiles/.wp_cron_$FLOCK_INDICATOR.lock wp cron event run "$EVENT_HOOK" --url="$SITE_URL" --path="$WP_PATH" --quiet

    done

done
- Add the following cron job to your Servebolt Control Panel with the following settings:
- Time interval:
*/5 * * * * - Command:
sh run-wp-cron.sh
6. This is what your cron job in the Control Panel should look like.

Your cron job should now be set up and running every 5th minute.
Should you have any additional questions please don’t hesitate to contact our support chat at servebolt.com!